Binding: Checking in Items Returned from Bindery
Purpose: To check materials back in from the Bindery which notifies patrons of their new location.
Begin by logging into Sierra
- Select “Check in Bound” from the Function menu
- Type the title from the bind slip into the search box and enter; open correct record; go to check-in card
- Verify that the correct boxes are highlighted and click “Check in Bound” from the horizontal tab
- A dialogue box opens and the first title of each session should be set up as follows
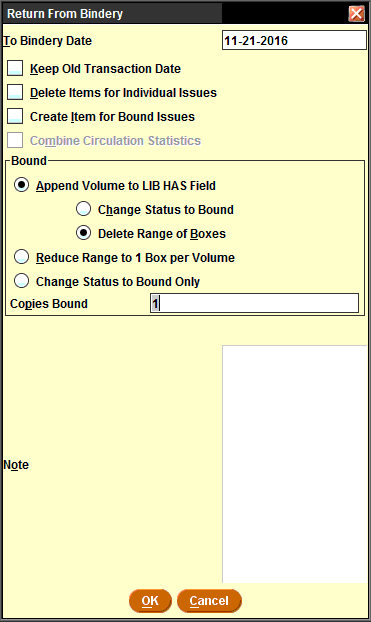
- Top section boxes are unchecked
-
- In the box under Bound, click on “Append Volume to LIB HAS field” and “Delete Range of Boxes”
- Check that “Copies Bound” defaults to 1 (not 0)
- Then click “OK”
- Holdings screen opens which shows the current volume appended to the holding statement. If correct, click “Submit”
- Data may be corrected manually from here, ranges added or deleted, or merged with previous range (that deletes any Note such as Per. Stacks)
- When done, click Apply Changes and Submit
- Checkin card displays with the boxes now deleted.
- Click “Close” at top right of screen and then “Yes” to save the changes
Modified procedure for Special Collections periodicals
- In check-in card, highlight boxes to be checked in, doing one volume at a time.
- Click Check in Bound
- A dialogue box opens and the first title of each session should be set up as follows
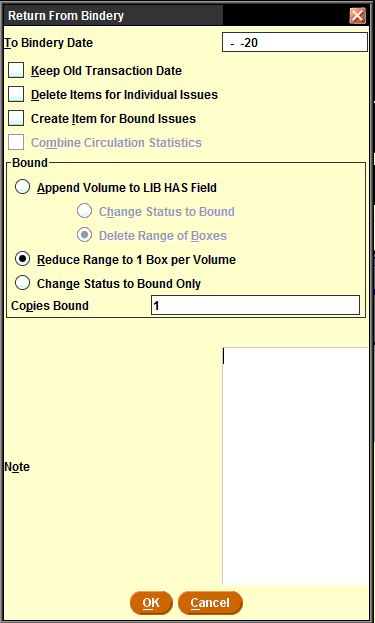
- Top section boxes are unchecked; type b (blank) in To Bindery Date box
- Click on Reduce Range to 1 Box per Volume
- Ensure Copies Bound reads 1
- Then click “OK”
- Boxes are consolidated into one.
- Check Holdings tab — holdings should be open ended, and unchanged
If the returning title is one that has ceased, been canceled or discontinued (eg. a title change) see dead title process.
Contact: um.library.technical.services@maine.edu
Return to Technical Services Table of Contents.