Digitization: BookDrive Editor
Purpose – BookDrive Editor Pro is used for image post-processing in order to enhance the scanned images in preparation
for processing through Abbyy (optical character recognition software) and eventual creation of a PDF document for public display.
Scheduling – please use the appropriate Google calendar to reserve scanner(s) and/or editing dongle.
Work space – program and files will run much faster from local drive; copy files to work on from I drive to local C drive, complete work and then move finished PDF back to I drive for OCR purposes; once at OCR machine move PDF to local drive for work there. Remember that the C drive can fail; if you need more than one session to complete editing process, move work to your U drive for storage between each work session.
Overall order of image and edit operation:
- Scan/Image (no longer need to create PDF at end of imaging session)
- Cull any unwanted images; best to do in the lab in case any pages need to be redone. (NOTE: Deleting unwanted images from scan folder at this point will cut down on post-processing time.) Possible to use Replace feature in the imaging program; but if not used, cull now to save time and effort.
- Edit
- OCR
- Resize for public access
Move files to be edited to desktop.
NOTE: software works much faster on local workstation rather than across network. (All team members have I drive mapped on their PCs; If I drive should inadvertently disconnect or otherwise become unavailable, it can easily be remapped.)
1. Insert dongle in USB port; open BookDrive Editor software
2. To open multiple files for editing, click on the L&R icon
3. Open folder; if you want to select all files within a folder highlight any file, and then invoke Ctrl A. If
you only want one file, simply highlight and click Open; for multiple files, highlight first one, before
highlighting second and subsequent, holding down the Ctrl key
4. Once file(s) are highlighted, click on Open.
5. As individual images open, a set of thumbnail sketches will appear running down the left hand side of the screen; the pair of images highlighted will appear in the editing section of the screen
6. Editing tools are located up above list of thumbnail sketches; click icon to activate
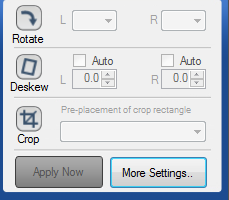
7. Rotate: Typically the BookDrive software on ATIZ machine in lab will take care of rotating images during the imaging process. However, if that is not the case, click on the Rotate icon to activate and manipulate images to the desire position.
8. Deskew: Clicking on the Deskew icon and then clicking the Auto boxes for both the L(eft) and R(ight) pages will invoke the deskew command which will run across each page during the batch process.
9. Crop: of the 3 options in the dropdown ‘varying based on page edge’ works best for the town reports (the other two options have a tendency to block out text).
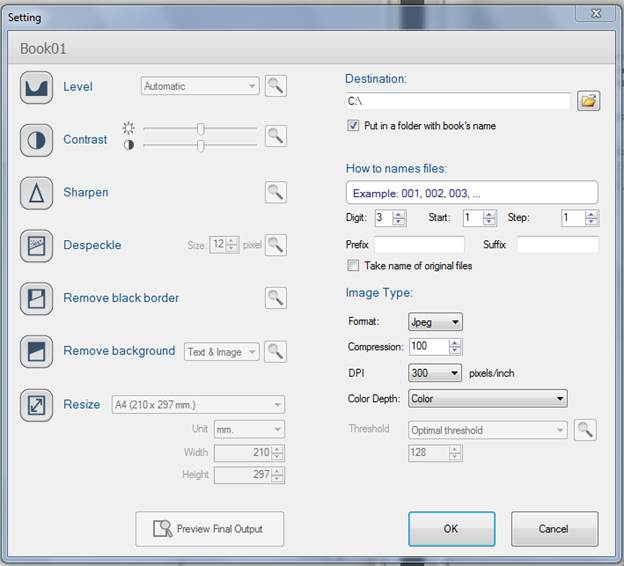
10. More Settings: click on this icon to open up access to advanced editing features such as Contrast, Sharpen, Despeckle, etc.
- Click on icon to activate setting feature; magnifying glass icon opens the fine manipulation window for each
feature. View in this window can be enlarged by clicking on 25%, 50%; maneuver text by holding predominant mouse
key and dragging - Level: This feature has a tendency to wash out text and does not work for town reports
- Contrast: Use to edit brightness level of text/image as well as contrast between text/image and background
- Sharpen: Use to help focus text; this feature should be turned on for every job
- Despeckle: Lowering number will remove more freckles, spots, etc. Be cautious not to lower to point of
removing portions of letters - Remove black border: This feature should be avoided as it has a tendency to remove text along the edge of
pages - Remove background: Best two options are Text & Image or Text Only
- Resize: There should be no need to change size as it is set during the imaging process
- Destination: Can be left blank as destination will be determined at time of export
- How to name files: Can be left blank as name will be assigned at time of export
- Image Type: Format will be Jpeg, Compression 100, DPI 300, Color Depth Grayscale or Black &White (B&W may wash
out text) - Preview Final Output: Click this button to see what the page will look like after settings invoked and batch
process complete - Once everything set on this screen click on OK
11. To apply all settings, click on Apply Now (icon should now be orange)
12. After settings have been applied, notice the red crop box around each page. Highlight top two thumbnail sketches, manipulate the crop boxes accordingly. To set both pages to exact same size of crop: Set size on either
L(eft) or R(ight) page, and then click corresponding arrow in gray bar up above page in large edit screen. Notice red flag appearing up over the right hand thumbnail sketch.
13. To apply crop settings to the remainder of the pages in document; click drop down menu to the right of the red flag and select ‘send crop value width, height, x, y to the following pages’.
14. After settings have been loaded, click on the Run Batch icon (located underneath the list of thumbnail sketches); as the batch runs notice that the individual pages flash across the edit area of the screen. Also, notice the status bar underneath each page notes each setting step of the process.
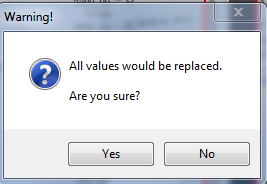
15. If Crop or Deskew settings are changed after initial load, the orange apply icon will change to Re-Apply Now; when clicked on, a Warning! box will appear on screen indicating that values will be replaced. This box refer
only to crop and deskew settings; the additional settings for contrast, speckles, etc. will not be replaced.
16. Export: One batch is complete, click the Export icon which brings up the E-Book Creator window Export as Multi-page, PDF.
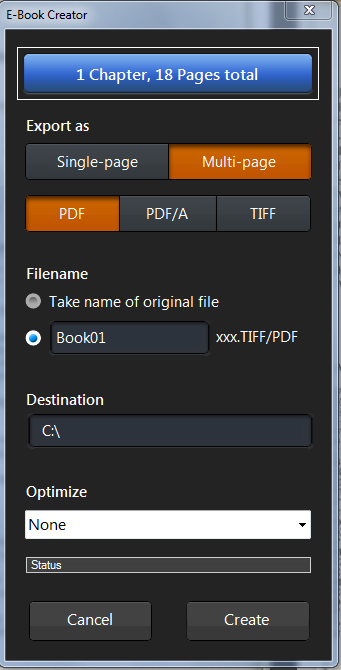
17. Enter book name in the 2nd radio button under Filename, indicate Destination, select Medium under Optimize, click on Create.
[**The following revision regarding final PDF page sizing was added on August 24, 2017.]
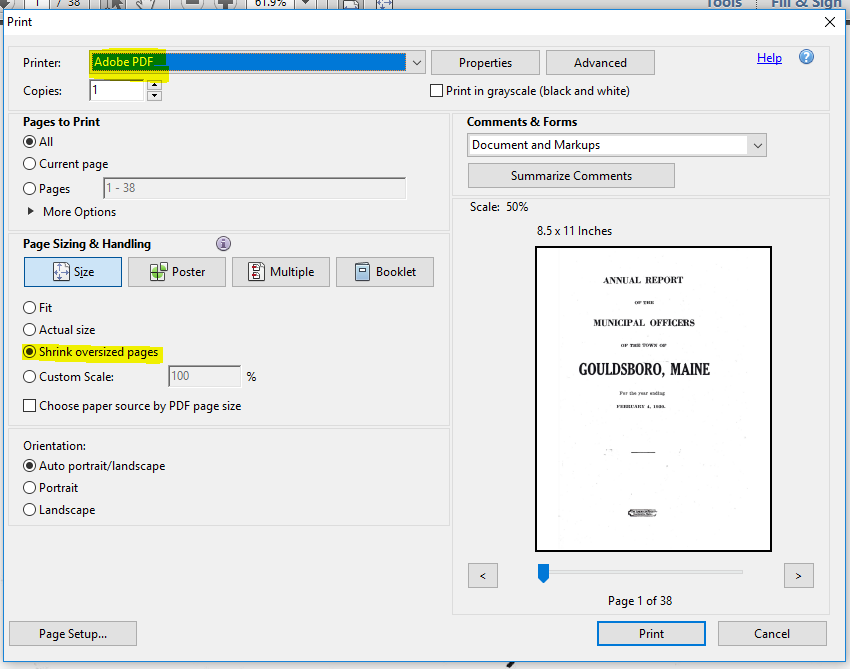
18. PDF will open on desktop, click on File, Print, select Adobe PDF from the Printer drop down menu.
19. Click radio button for Shrink oversize pages. Default size appears to be 8.5 x 11 which matches cover page that will be supplied by bePress. To check, right click on the open file in Acrobat and check document properties. First tab “description” will confirm dimensions.
20. Click on Print.
21. Name file and indicate saving destination, click on Save.
22. The resulting PDF can be used for OCR purposes.
23. NOTE: For file size management and display purposes, the OCR step must be done last. Please do not vary process steps as this may cause access and/or viewing issues for patrons.
Contact: um.library.technical.services@maine.edu
Return to Technical Services Table of Contents.