Digitization: Best Practices for Optimizing Web Images
Size Matters.
Images are employed on webpages and LibGuides to communicate and illustrate information. Images can occupy a large amount of visual space. Image files can also occupy a significant amount of storage space. In the WordPress environment web authors must remain mindful of the storage footprint they create across all media types posted to the website. The library currently has a total, shared media storage space of only 300 MB which must accommodate all forms of digital media from images and videos to PDF and Word document download files.
Selecting Images.
When using the Microsoft Snipping Tool to capture elements of on-screen software (or other content) to illustrate step-by-step instructions, focus on cropping the graphic as concisely as possible to communicate your message.
Image File Format.
PNG: use for graphics and illustrations with flat colors (eg. a screenshot from a system platform).
JPG or JPEG: use for complex, photographic images.
Typically, a website utilizes raster images; images made up of a grid of square pixels. Each pixel encodes color or transparency information. JPG, GIF, and PNG are the smallest file format in size, therefore most typically used on the web.
In the past, library web authors have utilized JPG, GIF, and PNG encoding for web-based images. Due to issues concerning visual quality vs. storage space, using the non-proprietary, lossless PNG format exclusively for illustrations is strongly recommended for images that utilize flat color, such as logos, icons, and software screen captures.
The PNG format preserves sharpness and clarity of line illustrations but, like GIFs, they present only 256 colors and may not be suitable for complex photographic images. File size can be further reduced when processing in Photoshop, by utilizing the Web Snap function (see step-by-step instructions, below).
Icon Fonts.
Another approach to minimizing the use of graphic files is the employment of icon fonts. Since 2012, fonts depicting popular web and technology icons (rather than letters) have been under development. There are many U.S.-based icon fonts currently available however only Font Awesome is supported by the University of Maine WordPress template. For now, the Fogler Library web team has opted to not adopt the use of icon fonts.
Create a web-optimized PNG using the Microsoft Snipping Tool and Photoshop CS6
1. Open Photoshop and minimize the interface for later use.
2. Open Snipping Tool (Start > Windows Accessories > Snipping Tool).
3. In Snipping Tool, Select New (or utilize the delay function).
4. Use your cursor to click and drag a box to capture the portion of the image desired.
5. Select Edit > Copy or use the keyboard shortcut Ctrl+c.
6. Move Snipping Tool window aside on your desktop,
7. Restore the Photoshop interface and in Photoshop, click File > New. Photoshop will automatically deliver a blank canvas with same dimensions and resolution as the image capture copied on the Snipping Tool clipboard.
8. Click OK.
9. Select Edit > Paste or use the keyboard shortcut CTRL+v to paste the image capture into the blank canvas.
10. Make any desired alterations to the image.
11. Go to File > Save As and select Format: Photoshop (*.PSD;*.PDD),
This step saves your Photoshop work file, allowing you to return to make further changes, edits, and alterations at a later time or date.
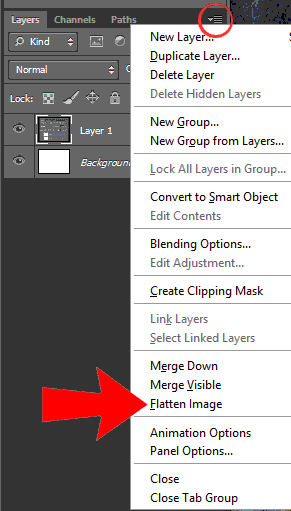
12. To create a web optimized PNG, return to your working file in Photoshop. In the Layers palette select Flatten Image (see illustration below). This action helps reduce file size.
13. Go to File > Save for Web
14. Adjust settings to the following (see illustration for interface layout):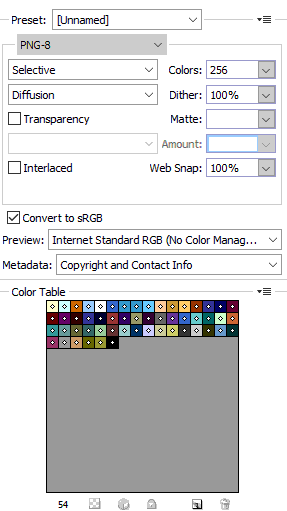
- PNG-8
- Selective
- Colors: 256
- Diffusion
- Dither: Syncs automatically
- Tick or untick Transparency, as appropriate
- Leave Matte blank
- Uncheck Interlace
- Web Snap: 100% (as appropriate)
- Set Preview as: Internet Standard RGB (No Color Management)
15. To save these settings, click the stack menu (aka hamburger menu) in the upper right corner of the dialog box, select Save Settings, and provide a name you will recognize and remember. When returning to Photoshop on your workstation in the future, Save for Web may default to your designated settings or you can recover the settings under the Preset drop-down menu. If you completed this step previously, skip to 16.
16. Click Save and name your new, optimized PNG.
17. If you have completed your work, close the original Photoshop work file. *DO NOT SAVE CHANGES in the work file or you will lose the ability to edit the separate layers you created.
Optimizing Digital Photograph
The following is a simplified and generalized approach to editing and saving photos for the web.
1. Open your image in Photoshop CS6
2. Select Image > Image Size
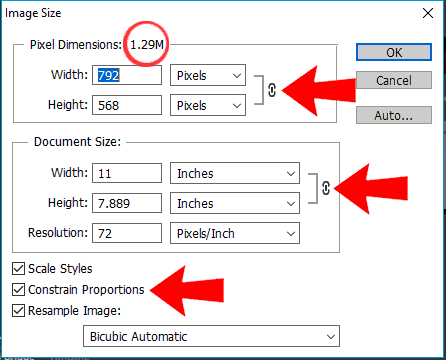
3. In the Image Size dialog box (see illustration), check the current Pixel Dimensions of your image. In the example above, the original pixel dimensions are 1.29M, too large to upload to WordPress.
4. Set the resolution of the image to 72 Pixels/Inch.
5. Confirm that the Contrain Proportions box is ticked (note the location of red arrows in illustration, above). This will maintain consistency in the image dimensions without distortion.
6. In the Document Size section, enter either the desired width or height of the final image. The chain link icons (indicated by red arrows) confirm that the dimensions are constrained, therefore you need to change only one dimension and Photoshop will automatically calculate the second dimension.
7. Click OK and check your work on screen.
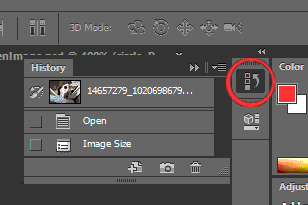
8. If you are unhappy with the results, go to the History Palette (see illustration), click and drag Image Size to the trash to undo the action to return to the file to original size. Repeat Step 7.
 9. Once you have finished adjusting your image, go to File > Save for Web and follow the steps below (see numbered arrows in illustration):
a. Confirm the Original tab is showing.
b. Under Preset, select JPEG Medium.
c. Select the 4-Up tab for available previews.
d. Review the “active” preview in the upper right quadrant. The file size and load time for a 56K dial-up modem appear in the lower left corner of each image option.
e. To further refine, adjust the quality slider that controls the “active” preview OR:
f. Select one of the lower resolution images (15 quality or 7 quality), gauging each image’s quality in the preview. The lower the resolution, the blurrier or more pixelated the image becomes.
10. Click Save and name your file

Contact: um.library.technical.services@maine.edu
Return to Technical Services Table of Contents.