Web Contributors: WordPress Basics
Access | Anchors | HTML Links | Images | Publishing
Introduction
To meet the needs of our increasingly mobile audience, Fogler Library adopted the University of Maine WordPress web template created by 10up web consulting services, and launched a re-designed website in January 2017.
This guide is designed to assist Library staff with the basics of web editing in WordPress. Staff can register for advanced, hands-on training at regularly scheduled training sessions offered by the UMaine Division of Marketing and Communications.
Access
To receive web editing access, email your request to Sharon Fitzgerald, quinn@maine.edu, and include information about which pages you need access to so the correct permissions can be set.
You will receive an email from UMaine Marketing containing an automatically generated password. Once your account is established, you can change this password.
Login
- Go to the Login page.
- Enter user name and password.
- Select “Pages” from the left menu.
- View the list of pages for which you have editing privileges.
- Click on the title of the page you wish to edit or click the “Add New” link in the left menu to create a new page.
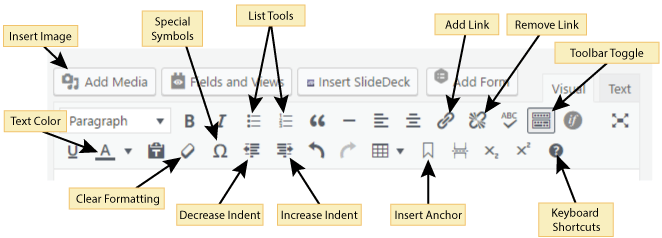
WordPress Toolbar
To access the expanded WordPress editing toolbar, click the Toolbar Toggle icon (find location on WordPress Toolbar graphic, below)
Editing
WordPress operates like a simple Word Processing program with a few exceptions. Some limitations are a function of the program itself and some are a function of the standardized UMaine template.
Paragraph Breaks
The UMaine template defaults to a double-space line return. Single-space returns can be accomplished by holding down the Shift key and hitting Return.
Phone Numbers
The style for html links promoted by the UMaine Division of Marketing and Communication is to use periods rather than dashes when formatting telephone numbers (i.e. 207.581.1661). This format instructs screen reading software to come to a full stop between the area code, exchange, and number, improving accessibility.
Currently, the UMaine WordPress template does not support clickable links to open a dial dialog for smartphones or other mobile devices.
Inserting HTML Links
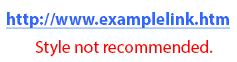
The style standard for html links promoted by the UMaine Division of Marketing and Communication is to not display URL addresses as links, but to create text to mask links.
Adding External Links
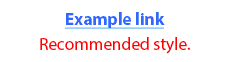
- Highlight the text you wish to turn into a link.
- Click on the “Add Link” icon (see WordPress Toolbar graphic, above)
- Type or paste the target URL in the pop-up text box and click the pencil icon to “Apply.”
- Click out of the active box to close the tool.
- Highlight the text you wish to turn into a link.
- Click on the “Add Link” icon (see WordPress Toolbar graphic, above)
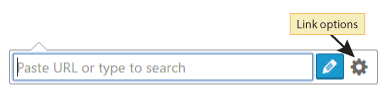
- Click on the “Link Options” gear icon
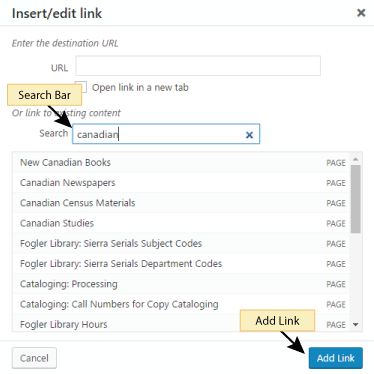
- Scroll through the list of pages currently published in the Fogler website or type the full or partial page name in the “Insert/edit” link dialog box. (Do not hit enter, as this will close the dialog box without inserting the desired link.)
- Click on the name of the title of the target web page.
- Click the “Add Link” button.
Inserting Email Links
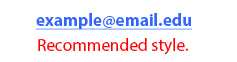
The style standard being promoted by the UMaine Division of Marketing and Communication for email links is to display the full address rather than just a person’s name.
Inserting Anchors
Long, scrolling pages can become more user-friendly through the use of page jumps (aka jump links) that utilize anchor text as a quick way to navigate content. To add a jump link:
- Place your cursor in front of the text or beside the image you plan to use as an anchor.
- Click the anchor icon located in the bottom row of icons in the WordPress Toolbar.
- Type your concise anchor name, with no spaces, in the anchor dialog box. Use camel case (Example: anchorWithCamelCase) for anchors containing multiple words.
- Click OK.
Linking to Anchors
- Highlight the linking text and click the “Insert/edit link” icon located on the top row of the WordPress Toolbar.
- Enter a hashtag “#” immediately followed by the name of the target anchor.
- Click the pencil icon to apply.

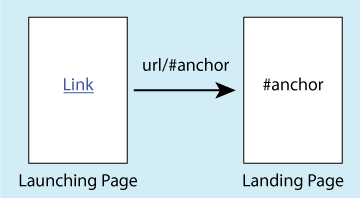
There are times an author wishes to direct the reader from one web page to a specific point on a different web page.
- Follow the steps for Inserting Anchors to create an anchor in the target landing page
- Navigate to the launching web page and highlight the text you wish to link.
- Click the “Insert/edit link” icon located on the top row of the WordPress Toolbar.
- Enter the URL for the landing page followed by the anchor tag (i.e. https://library.umaine.edu/wordpress-basics/#access).
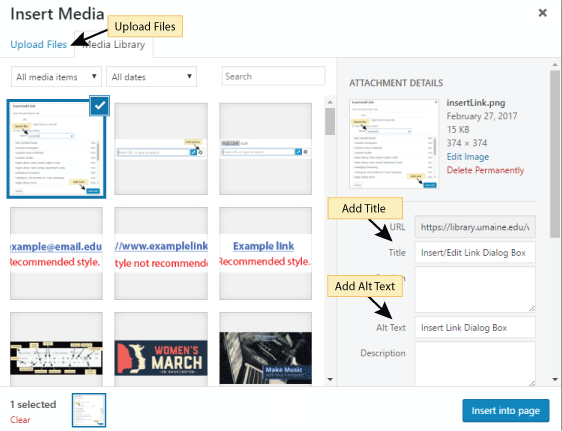
Adding Images
Before uploading photos or graphics to the WordPress Media Gallery, please refer to our Best Practices document for optimizing images.
- Click the “Add Media” button above the WordPress Toolbar to “Insert Image.”
- Click “Upload Files” in the subsequent pop-up window, and either drag-and-drop or navigate to the desired image file. Once uploaded, the selected image will be highlighted with a dark outline.
- Add an image title and informative alt text in the attachment details section.
- Confirm the desired “Attachment Display Settings” using the available drop down menu options.
- Click the “Insert into page” button.
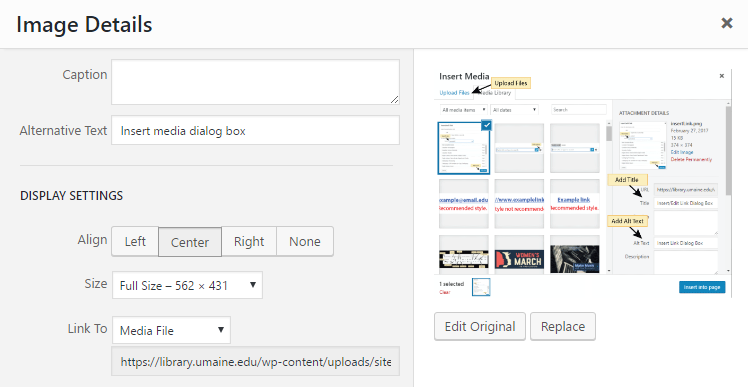
Editing Image Details
Image alignment, captions, and alt text can be edited in the page edit view.
- Click on the image you wish to edit.
- Adjust the alignment using the pop-up toolbar or click the editing pencil icon to open the Image Details dialog box.
- Make necessary edits and click the “Update” button to close the dialog box and save your changes.
Previewing Your Work
It is possible to preview web pages created in WordPress without publishing them to the public view.
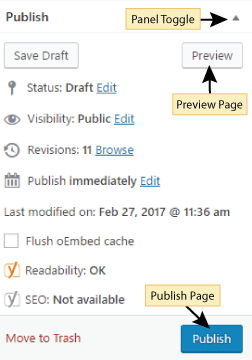
- Click the “Save Draft” button in the Publishing panel in the right-hand column.
- Click the “Preview” button.
- View preview in the new page, close the preview page to continue editing your work.
Saving Your Work
WordPress continually saves your work, but before leaving an editing session, you should click the “Save Draft” button in the Publishing panel. If you do not see this option, click the triangle located to the right of the word Publish in the right-hand column (see image above). This triangle toggles the panel open and closed. The application will default to show the most recent setting.
Unpublished pages can be found in the Drafts folder or All Pages folder and retrieved for continued editing. Draft pages are not visible to the public.
Once your editing work is complete, a page can go live by clicking the “Publish” button.
Return to the Web Contributors Guidelines
Contact: um.library.technical.services@maine.edu